

🕸️| Kubernetes


Kubernetes, also known as K8s, is an open-source system for automating deployment, scaling, and management of containerized applications.
How to setup Kubernetes
The central component of Kubernetes is a cluster, which is itself made up of multiple physical or virtual machines. Each cluster component performs a specific function as either a master or a worker—a master controls and manages the containers in the nodes, while a worker hosts the groups of one or more containers.
The diagram below portrays a general framework for a Kubernetes cluster:
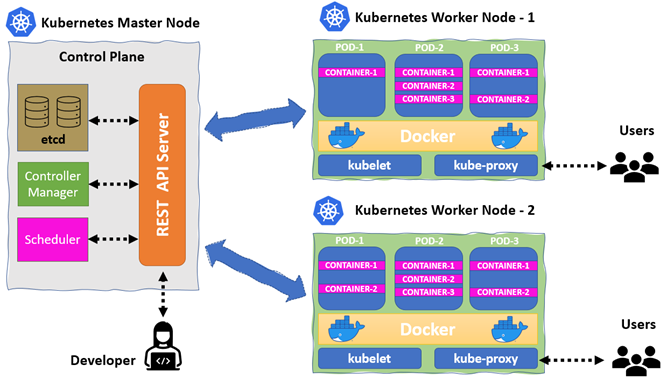
Kubernetes Architecture
This feature-rich cluster contains six key components, namely an API server, scheduler, controller, etcd, kubelet, and kube-proxy. Through this lens, the first four components run on the master, whereas the rest of the functions run on the worker.
In this article, you’ll learn how to develop a Kubernetes cluster from scratch.
Minikube and Kubeadm
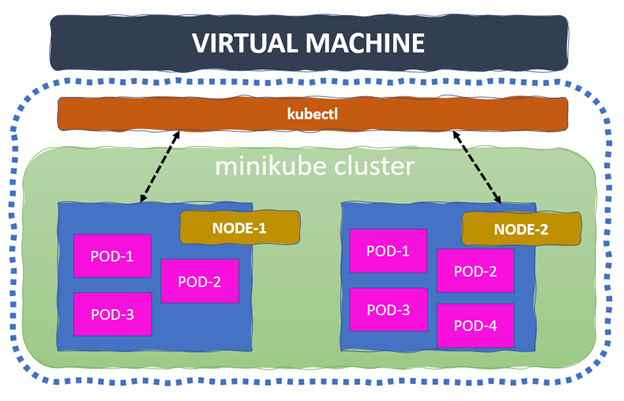
When it comes to designing a cluster, minikube and kubeadm are the predominant solutions. Designed for learning, development and testing, minikube is a fast and simple solution for deploying a single node cluster.
Architecture overview of minikube
kubeadm builds a minimum viable, production-ready Kubernetes cluster that conforms to best practices. It also allows us to choose the container runtime, though it has Docker by default. This solution requires a minimum of two VMs to run the master and worker.
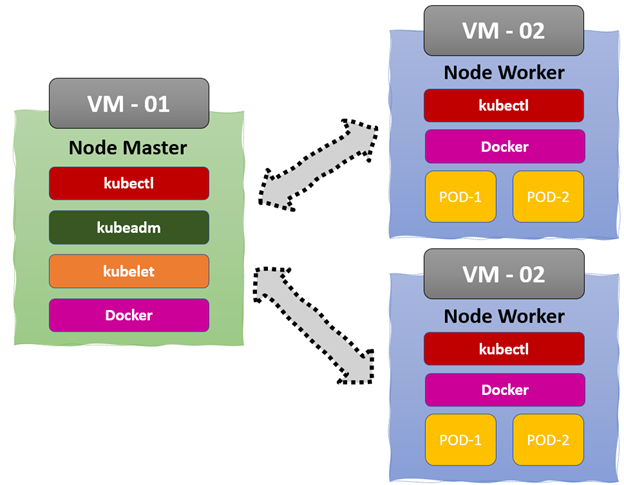
Overview of kubeadm architecture
Now, let’s delve into the installation steps. They’ll be illustrated from the root user-space, so if you’re trying them from non-root user-space, add sudo before every command.
Container Runtime: Docker Installation
Using Docker as the default container runtime, let’s start the installation on the machine.
First, update the existing repository in the machine with the following command:
apt-get update -y
Next, install a few prerequisite packages. These allow apt to use secure channels using HTTPS:
apt-get install apt-transport-https ca-certificates curl gnupg lsb-release -y
Then, add the GPG key from the official Docker repository:
curl -fsSL https://download.docker.com/linux/ubuntu/gpg | sudo gpg –dearmor -o /usr/share/keyrings/docker- archive-keyring.gpg
Add the Docker repository to the apt sources list:
echo “deb [arch=$(dpkg –print-architecture) signed-by=/usr/share/keyrings/docker-archive-keyring.gpg] https://download.docker.com/linux/ubuntu $(lsb_release -cs) stable” | sudo tee /etc/apt/sources.list.d/docker.list > /dev/null
Next, update the package information with Docker packages from the apt sources list:
apt-get update -y
Finally, install Docker:
apt-get install docker-ce docker-ce-cli containerd.io -y
Update the default Docker daemon configuration in /etc/docker/daemon.json:
cat <<EOF | sudo tee /etc/docker/daemon.json

{

“exec-opts”: [“native.cgroupdriver=systemd”],

“log-driver”: “json-file”,

“log-opts”: {

“max-size”: “100m”

},

“storage-driver”: “overlay2”

}
Enable the process to start on boot, and reload the Docker daemon:
systemctl enable docker

systemctl daemon-reload

systemctl restart docker
To get the present status of the Docker daemon installed in your machine, use:
systemctl status docker
● docker.service – Docker Application Container Engine

     Loaded: loaded (/lib/systemd/system/docker.service; enabled; vendor preset: enabled)

     Active: active (running) since Fri <date> <time> UTC; <time> ago

..

.. output truncated ...

..
Now, let’s render the version information in an easy-to-read layout:
docker –version
Output: Docker version <version>, build <build>
If we want to access the Docker from non-root user-space, create a new Docker group and add the current userspace to it:
usermod -aG docker $USER
# groupadd docker
We’ll then run a hello-world image to check every component is working:
docker run hello-world
Output: Hello from Docker!
This message shows that your installation appears to be working correctly.
Congrats! Docker is successfully running on your machine.
Standalone Kubernetes Cluster: minikube
Minikube is the local Kubernetes cluster used primarily for learning and exploration of Kubernetes. We need a simple Docker or VM environment in a Linux, macOS, or Windows platform. In our case, Docker is the container runtime for our Kubernetes cluster, and you can use the Docker installation instructions from the previous section.
Assuming you’ve successfully installed Docker, let’s start the minikube installation.
First, download the latest minikube library:
curl -LO https://storage.googleapis.com/minikube/releases/latest/minikube-linux-amd64
Use this install command to copy the file and set the file attributes for execution:
install minikube-linux-amd64 /usr/local/bin/minikube
Finally, with Docker as the container runtime, let’s start the minikube:
minikube start –driver=docker
😄 minikube v1.24.0 on Ubuntu 20.04 (amd64)
✨ Using the docker driver based on existing profile
👍 Starting control plane node minikube in cluster minikube
🚜 Pulling base image …
🤷 docker “minikube” container is missing, will recreate.
🔥 Creating a docker container (CPUs=2, Memory=2200MB) …
🐳 Preparing Kubernetes v1.22.3 on Docker 20.10.8 …
🏄 Done! kubectl is now configured to use “minikube” cluster and “default” namespace by default
Let’s render the minikube version in an easy-to-read layout:
minikube version
minikube version: v1.24.0
commit: 76b94fb3c4e8ac5062daf70d60cf03ddcc0a741b
Create an alias for the “easy access to kubectl” command:
alias kubectl=”minikube kubectl –“
To get the list of all running pods in the cluster, use:
# kubectl get pods -A

NAMESPACE           NAME                                           READY   STATUS       RESTARTS    AGE

kube-system            etcd-minikube                               1/1    Running   1 (6m58s ago)   7h35m

kube-system            kube-apiserver-minikube                     1/1    Running   1 (6m58s ago)   7h35m

kube-system            kube-controller-manager-minikube            1/1    Running   1 (6m58s ago)   7h35m

kube-system            kube-proxy-qjnsk                            1/1    Running   1 (6m58s ago)   7h35m

kube-system            kube-scheduler-minikube                     1/1    Running   1 (6m58s ago)   7h35m
To get the cluster node details, use:
# kubectl get nodes

NAME       STATUS   ROLES                   AGE VERSION

minikube   Ready control-plane, master   7h52m   v1.22.3
Congrats! You just successfully built a minikube cluster On the local machine.
Production-Grade Kubernetes Cluster: kubeadm
The kubeadm toolbox acts as a bootstrap for creating a production-grade Kubernetes cluster, making a single master node with an etcd configuration. Here, Docker is the cluster’s container runtime, and you can refer to our Docker installation steps above.
Assuming you’ve successfully installed Docker, let’s build the cluster using the kubeadm toolbox.
Add the Kubernetes repo GPG key into the key manager:
# curl -fsSLo /usr/share/keyrings/kubernetes-archive-keyring.gpg https://packages.cloud.google.com/apt/doc/apt-key.gpg
Add the Kubernetes repo details to the repository source list:
# echo “deb [signed-by=/usr/share/keyrings/kubernetes-archive-keyring.gpg] https://apt.kubernetes.io/ kubernetes-xenial main” | sudo tee /etc/apt/sources.list.d/kubernetes.list
Here, the installation comes in three pieces: kubelet, kubeadm, and kubectl. Let’s update the repository and start the installation:
# apt update -y
# apt-get install -y kubelet kubeadm kubectl
To hold the installed packages with current versions, use the command below. These packages cannot be upgraded or removed until the hold mark is removed.
# apt-mark hold kubelet kubeadm kubectl
Enable the process to start on boot and reload the kubelet daemon. Check the current status of the daemon:
# systemctl enable kubelet

# systemctl daemon-reload

# systemctl restart kubelet.service
Kubeadm installation is now complete. Let’s create the new cluster using kubeadm init:
# kubeadm init

[init] Using Kubernetes version: v1.23.1

[preflight] Running pre-flight checks

[preflight] Pulling images required for setting up a Kubernetes cluster

[addons] Applied essential addon: CoreDNS

[addons] Applied essential addon: kube-proxy
Your Kubernetes control-plane has initialized successfully!
To start using your cluster, you need to run the following as a regular user:
# mkdir -p $HOME/.kube

# sudo cp -i /etc/kubernetes/admin.conf $HOME/.kube/config

# sudo chown $(id -u):$(id -g) $HOME/.kube/config
Alternatively, if you are the root user, you can run:
# export KUBECONFIG=/etc/kubernetes/admin.conf
You should now deploy a pod network to the cluster.
Run “kubectl apply -f [podnetwork].yaml”
We often use Calico as the cluster’s network provider, as shown here:
# kubectl create -f https://docs.projectcalico.org/v3.15/manifests/calico.yaml

configmap/calico-config


createdclusterrole.rbac.authorization.k8s.io/calico-kube-controllers createdclusterrolebinding.rbac.authorization.k8s.io/calico-kube-controllers

createdserviceaccount/calico-kube-controllers created

Now, we can join many worker nodes by running the following join command on each worker node as root:

# kubeadm join 10.190.0.2:6443 –token ls7ryl.mlrc2oaoob15gbog –discovery-token-ca-cert-hash sha256:13aa6e021229373bfdceb8537ab50056c7fb6b4b67435ad165ceb1b5131c9dfc

[preflight] Running pre-flight checks

[preflight] Reading configuration from the cluster…


[kubelet-start] Starting the kubelet

[kubelet-start] Waiting for the kubelet to perform the TLS Bootstrap…

This node has joined the cluster:

* Certificate signing request was sent to apiserver and a response was received.

* The Kubelet was informed of the new secure connection details.
Let’s execute the below command to check the node joining status on the cluster:
# kubectl get nodes

NAME            STATUS     ROLES                 AGE   VERSION

iod-master      Ready      control-plane,master   44h   v1.23.1

iod-worker-2   NotReady   <none>                 32h   v1.23.1

iod-worker-3   Ready       <none>                32s   v1.23.1
Kubernetes Cluster Alternatives
kOps (Kubernetes Operations) is an open-source tool that helps us create and manage the Kubernetes cluster. It’s also the best tool for deploying a small-scale, production-grade cluster, allowing the deployment of highly available Kubernetes clusters on cloud platforms like AWS and GCP.
Some of kOps striking, out-of-the-box features include: CloudFormation and Terraform configuration, automatic idempotency, rolling cluster updates, and master high availability.
Kind is the tool for deploying a less resource-intensive cluster locally. Again, it’s a single-node cluster running on a Docker container. We can quickly deploy the Kubernetes cluster using a simple YAML file. However, the network management for this option is a little complex for beginners.
Another simplified Kubernetes cluster solution for IoT and edge computing is K3s. Designed for production workloads inside the IoT appliances, the total package weighs less than 50MB. This further reduces dependency and the number of steps involved in the lifecycle management of the cluster. It works on a range of devices, from a Raspberry PI to a Cloud platform, and it’s optimized for the ARM platform.
Finally, the click-and-run solution for deploying a Kubernetes cluster locally and running in under 60 seconds is MicroK8s by Canonical. It provides an inexpensive ground for proving ideas and with lower overhead, developers can ship builds faster than ever.
Secure the Cluster with Kubescape by ARMO
In the digital era, establishing security guardrails is essential for safeguarding your devices from attackers. Cluster hardening is one of the most critical processes for securing the configuration and settings of the cluster, to reduce IT vulnerability and the probability of being compromised. It also reduces the attack surface and vectors for attackers who continuously seek to exploit devices for malicious activity.
Kubescape scans K8s clusters, YAML files, and HELM charts, detecting misconfigurations according to multiple frameworks (such as the NSA-CISA, MITRE ATT&CK®), software vulnerabilities, and RBAC (role-based-access-control) violations at early stages of the CI/CD pipeline, calculates risk score instantly and shows risk trends over time.
You can quickly install Kubescape using the command:
# curl -s https://raw.githubusercontent.com/armosec/kubescape/master/install.sh | /bin/bash
After successful installation, check the Kubescape version:
# kubescape version
Output: Your current version is: v1.0.90
Now let’s scan the cluster as per the NSA framework:
# kubescape scan framework nsa
We can also scan the cluster as per the MITRE framework just by changing the name:
# kubescape scan framework mitre
We can skip the namespaces using the command:
# kubescape scan framework nsa –exclude-namespaces kube-system,kube-public
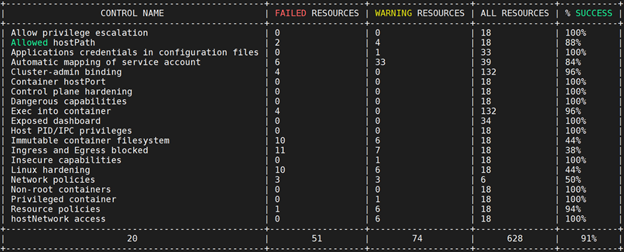
Kubescape's scan results summary
# kubescape scan framework nsa –include-namespaces development,staging,production

# kubescape scan framework nsa *.yaml

# kubescape scan framework nsa –verbose

# kubescape scan framework nsa –format json –output results.json
Besides the cluster setup, we can scan the container images at frequent intervals, they’ll then be uploaded into the Kubescape SaaS platform. The scan runs every midnight according to the default schedule, but we can change the schedule by updating the scanSchedule Helm value in the armo-scan-scheduler.
The Kubescape SaaS platform comes with enhanced security and is easy to use. We can easily tunnel the cluster scan results to the cloud for a detailed review.
Summary
Today, we’ve covered the basics of Kubernetes clusters and their core components. We’ve also seen an architectural overview of kubeadm and minikube, a step-by-step guide for building the cluster, as well as a number of tools available for cluster development.
With so many ways to build the cluster, Kubescape provides a comprehensive security posture and quick installation.
 Written by River
CEO @ AIO Tech Ltd
CEO @ Seven Seas Hosting


